|
INSTALLATION GUIDES
WELCOME TO ONLINE INSTALLATION GUIDES
You may have been requested to visit this site BEFORE you even received any equipment that your going to install. However, If your re-using your own alarm transmitter, or using a telephone line for monitoring, and only re-programming your alarm, no new equipment is needed. However, you will need to complete section A & D below, ASAP.
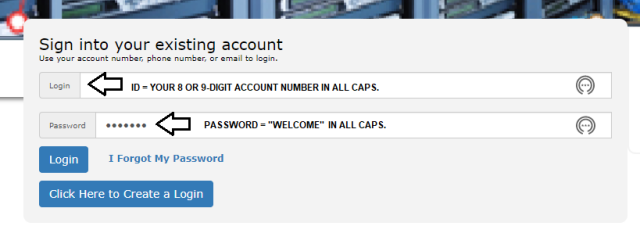
Please visit www.GoToMyAlarm.com and click on "Subscriber Log In"
- Use Your account number and use the temporary password "WELCOME" to login.
- (If for any reason you cannot log in, please call (888) 769-8977 to verify your login information.)

- During log in, you will be offered to change your log in ID if you choose.
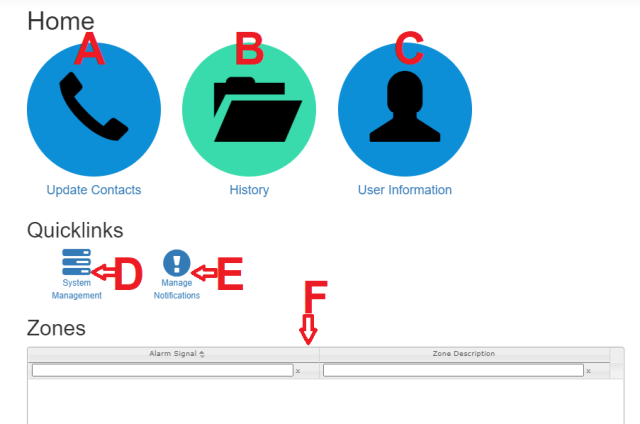
- Once you have confirmed your choice of log in ID's, you will come to the "HOME" screen. (Note: A thru F are added in this illustration for your reference only.)

- Section A: First you will need to add / update your alarms EMERGENCY CONTACTS.
- You can add up to 3 contacts before we dispatch on an alarm to call for a password.
- You can add up to 3 contacts AFTER we dispatch on an alarm.
- Adding more that a total of six (6) contacts may cause your account to be billed $2.00 per month, for each additional contact.
- You should also change the generic password to a new one.
- Section D: Second, just before you are ready to test your alarm, you need to put your account ON TEST to prevent a dispatch. (Remember to take it off test when done.)
AFTER YOUR FINISHED WITH INSTALLATION & TESTING:
- Section B: Here you can review your alarm signals in the monitoring center.
- Section C: Here you can review your account information.
- Section E: Here you can add email or TEXT messages on any alarm condition in near real-time. (If you did not order E-Notify services in advance, you may be billed $5.00 extra for this feature, regardless of number of notifications.)
- Section F: Here you can add zone descriptions to your alarm monitoring account.
ONCE YOU HAVE COMPLETED THE ABOVE, YOU MAY USE THE INSTALLATION GUIDE BELOW,
BASED ON THE ACTUAL EQUIPMENT YOU RECEIVE.
.
.
xxx
|